
Check out the complete step by step of how to create and configure your server on Discord. We'll start by explaining how to do it on the PC and then show the process on the phone. First of all, if your Discord is in English, find the gear icon located next to your username, on the main screen of the program. Then, select the "Language" menu and choose "Brazilian Portuguese".
Creating your server on Discord
First, click on the "+" icon located in the upper left corner of the program. On the next screen, select "Create a server". Then, define the name, region and presentation icon of your server and then click "Create". There, your server is already created and the next window will inform you of the link that you must send to your friends so that they can access the server. To access the invitation link, you can always click on the " Create invitation " icon that is located to the right of the "General" channel on your server. Note that, by default, the invitation expires in 1 day, but you can check the box shown in the image above so that it never expires. In addition, by clicking on the gear icon, you can set more personalized options for the invitation, such as the exact validity period and the maximum number of users.Configuring your server
After creating the server and adding friends, you will need to do some quick settings before you start using Discord.Creating and configuring a channel
By default, as soon as you create a server on Discord, two channels are created automatically, one for text and one for voice: To create new groups, just click on one of the "+" icons, shown in the image above, choose the type of channel (text or voice), define the name and select "Create channel". Then, with the new channel created, click on "Edit Channel" (gear icon in the image above). The new window will show a menu where you can configure several points such as:- Time interval in which messages can be sent;
- Use of emojis;
- Use of links;
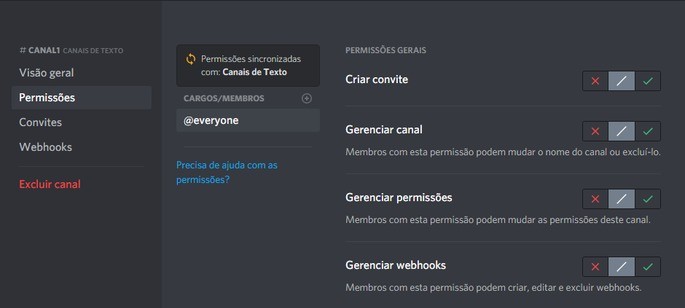
- Creation of positions for members;
- Permissions that each member has on the channel, among others.
How to create bots on Discord
Bots are small programs that you can link to your server or specific channels and that have several utilities for management, moderation, entertainment, etc. Discord bots are developed by the community itself, so there are countless types running on the internet. To choose the ones that are right for you, go to Discord's official bot page and read the program description. It has something for everyone. When you find a bot you want to install, click on the "Invite" button shown in the image below: On the next screen, select the desired server and choose "Authorize": Ready, the bot will be installed and will work automatically.How to create and configure a Discord server by cell phone
To create and configure a Discord server on your phone, you must first download the program's application. Click on the links below according to your operating system: Download Discord for Android Download Discord for iOS After installing and logging into the application, click on the menu located in the upper left corner of the screen and then click on the "+" icon shown in the image below: Then, just follow the same steps explained above in the PC version, both to add friends and to create channels. The interface is exactly the same and you just need to click on the same icons. To configure your channel (positions, permissions, emojis, etc.), you must click on the desired channel and then click on the "..." icon in the upper right corner of the screen and access "Channel settings": In this menu you will find all the definitions mentioned above. Customize it any way you like. How to add friends on Discord on PC and mobile (2019) The 7 best bots for Discord and how to install! Use the online HTML converter to maximize your web content composing efficiency.